Azure Release Pipeline with WebApp 1. Create a web app using App services. 2. Create an Azure DevOps Repo for.NET core project and Create ...
Azure Release Pipeline with WebApp
1. Create a web app using App services.
2. Create an Azure DevOps Repo for.NET core project and Create a pipeline and in the pipeline using Assistant select the publish
3. To make sure the pipeline is created successfully, save and run the application as a pipeline job and once the execution is completed you will find that there is an artifact ( build artifact) created with a name drop ( you can expand it and find all the files related to the artifacts).
4. Select the Pipelines-->Releases option and Click on New Pipeline button.
5. In the template option select Azure app service Deployment. Click on Apply button.
6. Once you come back to the Release pipeline screen then Click on the +Add Artifacts button and select the build Artifacts.
7. Select the job and task link and click on it and provide the Task information and shown below.
8. Click on the Save button and then click on Create Release button and provide the information about the release similar as shown below.
9. Click on Create button to create the release pipeline and click on the Release link and it will show the Release process.
10. Click on Deploy to deploy the app on the web app service. Once the deployment is done then go to the web app URL and you will be able to see the application output on browser.
11. You can check the logs of the pipeline by using.
Continuous Deployment
Select the Release pipeline and Click on Edit.
Click on the trigger and enable the Continuous deployment trigger.
Now change the code in Azure Repos and check on Web app url that changes are reflected automatically.
Parallel Stages
Select the Release Pipeline and Click on Edit Button.
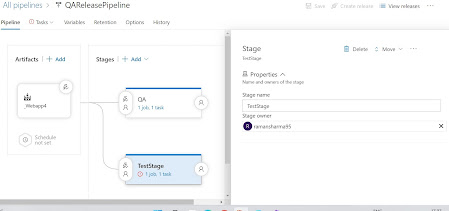
Click on the +Add button and select App service for deployment option and click on apply and provide the stage Name which you want to create in parallel deployment.
Sequential Stages
Select the Stage and under that, there is a +Add button click on that for the sequential Stage.
and select the stage-related application template and follow the same steps as mentioned in the released pipeline to deploy it on WebApp.
Approval and Gates.
Release Pipeline with Approval (Continuous Delivery)
When you deploy the stage of a release pipeline you want that there must be an approval required before the build code move to an environment like prod.


This comment has been removed by the author.
ReplyDeleteThank you for sharing such useful information about Food and Travel Guides. I value and respect your opinion. You can also Checkout our amazing services of ASP.Net Development Services.
ReplyDeleteThanks for sharing this content, Very informative blog. The best erp for manufacturing industries.
ReplyDelete